Monday 30 January 2012

1/100 WW2 French Buildings (FOW)

I'm currently waiting for new supplies to come in so I can finish off the stuff on the bench but until that happens here's a few pics of an old scenery project I did a few months ago for the fun of it. Personally I really enjoy doing buildings, easily as much as figures or ships or whatever. In this case all the buildings I knocked up were made simply from card and paper with paints, sand, flock etc. All the buildings are scaled to FOW bases; the shed fits one medium stand, the cottage two and the farmhouse loads. All of the roofs are removable. These were enjoyable to build (although really time consuming) so one day hopefully I'll get round to doing more.

I was very pleased with how the ivy - flock - turned out.  

The roof got a ton of washes; green, brown black and some strong tone dip, I left the shine as it looks like it's  rained recently. 

Really basic interior to allow troop placement. 

My attempt at a rusty corrugated iron roof. 


The inside of the farmhouse has removable floors which rest on corner supports (not pictured).
The trellis above will have vines wrapped around it when painted. Should give it an authentic French look. 

A breach in the rear wall, perfect for an AT gun. 


Tbh all of these need mounting on MDF bases as the cardboard is simply gonna warp given a little time, but it was all I had to hand. 

Saturday 28 January 2012

Visiting 1RGR (Royal Gurkha Rifles)


Its been a hectic few weeks so posts have been thin on the ground. As part of my postgrad masters we spent a day at Shorncliffe Camp in Folkestone, Kent meeting the officers and men of 1RGR (Royal Gurkha Rifles). It was a great day and we got so speak to a lot of Nepali soldiers as well as British officers about their experiences in Afghanistan in Herrick 7 and 12. In my MA we mainly study terrorism and counterterrorism, as well as insurgency and counterinsurgency, so it was really insightful to hear the opinions of people who actually fought on the frontline and were not behind a desk pushing paper or reading theory.

The overwhelming impression I received - apart from the friendliness of the Nepalis - was their dislike for counterinsurgency operations. This wasn't because they intrinsically disliked helping the Afghanis, far from it, but that ultimately they were soldiers. This might sound like an obvious point but in a modern world where politicians and generals are very keen to impress to the public that the Army is about humanitarianism and reconstruction it was nice to hear what the guys at the front thought. Well Gurkhas anyway. They had much preferred the earlier stages of the conflict, when it was more conventional and kinetic, rather than the difficulties of counterinsurgency where identifying your opponent, not eliminating him, is the most difficult challenge. Also they commented on how the political aspects of the conflict, such as the ineptness and corruptness of the ANA and ANP and their self-destructive rivalries, made constructive cooperation almost impossible.

Asides from some friendly banter and discussion they also laid on some battle drill demonstrations for us and did a great segment on weaponry and equipment where we were allowed to put our paws all over their high-tech goodies. As a civilian you never really get your hands on an IR scope, laser-rangefinding binoculars or a 40mm automatic grenade launcher. Suffice to say, it was good fun. Here are some pictures I took on the trip, didn't get many as I was too busy enjoying myself!

Also, I met Dip Prasad Pun, who if you haven't heard about, you really should take a look!

http://en.wikipedia.org/wiki/Dip_Prasad_Pun

These first three are all trophy weapons taken in the 20th century.


A beautiful Kukri


Me with an L115A3, terrible picture, but then, I didn't take it :P


0.50 cal - a complete beast in the flesh!


Saturday 21 January 2012

Modelling Guide: Magnetising BFG Chaos Cruisers

I picked up some Battlefleet Gothic Chaos ships from Ebay a few days ago; 2 chaos cruisers, 9 idolators and 9 infidels. I already have four chaos cruisers from the starter set at home (altho I think after 7 years they'll probably be in a bad way) so this should be a reasonable fleet once I add a battleship or grand cruiser. I'm planning to eventually get an Imperial and Chaos fleet so this is only the beginning really. 

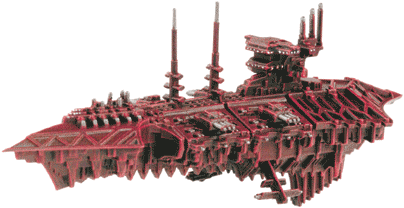
A picture from GW, so you know what I'm on about. 
Anyhoo, I decided I wanted to magnetise them so that they could be used as any class from the fleet list (except for the Heavy Cruiser with all the lances) so that I could exercise some fleet flexibility without paying through the nose. After all, GW ships are beautiful, the best quality, but relatively pricy, even second hand. 

The magnets I used were from here and were 3mm (diameter) by 1mm (depth) with roughly 200grams of attractive force. They were £6.00 for 50 (12p each), so not too bad considering I planned to use 8 on each cruiser.

The Method

I cut small recesses into the hull of the cruiser where the 'weapons panels' slot on, gluing the magnets in place. This is a little fiddly as they are attracted to each other but a bit of patient holding does the trick while the glue goes off. I wasn't worried about their polarity at this stage. 


I then hollowed out small grooves in the backs of the weapons platforms, filling them with as much metal as I could, in this case pins and bits of wire. I found that the more metal I could get on these the better they stuck to the magnets (obviously I suppose). 


The Lance turrets received a little extra attention. I enlarged the receiving hole slightly with a drill bit, then drilled the turret and inserted a piece of wire the same width as the hole for a nice snug fit. These two pieces slot together and allow the turret to rotate, held firmly in place by the magnet which holds the weapons platform in place. Neat eh?


I then glued a piece of sprue inside the hull to create an even platform, then attached magnets which would line up with the dorsal turret mounts on top of the ship. The right-hand magnet was for the interchangeable bridge pieces and was omitted on the second cruiser I did as unnecessary. 


I then got the dorsal masts and lance turrets, drilled holes carefully and glued pieces of wire in place. These were then tested on the assembled model and cut to the correct length, ensuring that they sat flush with the top of the hull and contacted the magnets inside the hull. 


Similarly with the bridge pieces I replaced the small plastic protrusions with pieces of wire which would line up with the existent holes. 


The end result of this fiddly work is an entirely interchangeable cruiser. All of the components are removable and replaceable. The magnets are powerful enough to hold the pieces in place without movement, unless they are given a knock. I didn't take a picture but if you turn it upside down, nothing changes. Also, all the turrets rotate for dynamic posing!

One random configuration. (Note: the turrets look wonky but this is due to the lighting). 
And another completely different one!
All the various components broken down. 

Btw I realise that some of the ships, such as the heavy cruisers, have these mast-like protrusions from their flanks. However, I really couldn't be bothered with these - they'd have been a hassle to fix in place with magnets and would have broken off easily if glued in place. Also, they don't add that much to the look of the ships in my opinion. 

Basing

I also needed a solution for the bases. I wanted removable bases so that they could be stored or transported easily ( I already have enough broken ships...) and after eliminating CorSecEng's awesome omni-stands on cost (with shipping from the US they would have cost a bomb) and size (he has since realised smaller one, grrrrrr) I came up with my own idea. 

As you can see below they're mounted using the same magnets I used elsewhere. The wire peg on the flight stand goes into a corresponding hole on the hull. This ensures that even when knocked the ship stays facing in the same direction. They have a little bit of movement if you slap them around but its well within an acceptable limit. Also, if you hold them upside-down they stay in place no problem. However, I think I might need a better solution - or much bigger magnets - on the heavy, metal capital ships to come. 


I had to fill the existent flight-stand holes with Green Stuff to make flat surface for the magnet to adhere to. 


The same idea as with the cruiser but on a metal frigate. 
Looks a little uneven, might have to redo this one. 

The first of these ships are just getting their undercoat so I should have a test figure painted up soon enough. I'm thinking the classic black, red and gold chaos scheme, maybe with some brown added in or some rusty/dirty washes as well.

Saturday 14 January 2012

Review and WIP: Nazi Zombies!

This post is a brief review mixed with a WIP of how my shambling horde is looking so far. 

Whats more evil than a Nazi? a reanimated dead one of course... 


If you haven't seen Dead Sno, then you should. Its a great foreign film and its basically, along with Call of Duty, the inspiration behind this little Weird World War tangent. That and some discussion on the WWPD forum. 

These models are from Rebel Minis; they also do American GI zombies and Russian Strelkovy zombies which look great. However, I didn't have the colours for these and well, they're just not Nazis are they? I picked these up during the Christmas sale with a cool 20% off and worldwide shipping for $5, basically, they were a steal! The models themselves are great; only a little flash and fewer mould lines than say Old Glory. However, the the detail is a little soft on some areas such as the helmets and the faces could be a little crisper. Overall, very good though. 

The set (21 zombies, I bought 2) comes with seven different poses, 1 officer and 3-4 of each of the rest of the poses (see below). 


I couldn't resist the modelling opportunities to be had with zombies and decided I'd try and make each one look like an individual (ironic eh?)

The horde


Here's a few of my personal favourites. 

A crawler. Just some clippers, some green stuff and some bending. 


This guy had a hole drilled right through him and some intestines sculpted. 

Some head injuries. 

'You gotta aim for the head!' ... one zombie down for good. 
I didn't do anything to this guy, he just looks great!


Here's a few pictures grouped by original pose so you can see what I did to try and differentiate them.

I should probably bend a few arms here come to think of it.


As you can see I made liberal use of headswaps, some head repositioning, arm bending, snipping and some drilling to get the results above. There's a few where I could have done more with but nevermind, this took long enough. Painting to come!

Pros

  1. Great value at $10.99 for 21 (or cheaper in platoon packs depending on how many you want). 
  2. Good detail - not as good as OG, but pretty damn good. 
  3. No equipment  - they don't have the breadbag, zeltbahn, bayonet etc on their backs. This'll speed up the painting so much!
  4. Good scale  - they line up really well with Old Glory and PSC. Maybe a little on the slim side for BF. 
  5. Very little flash/mould lines. Didn't need much cleaning up.
  6. Great for conversion fun!
Cons
  1. Detail can be a little soft on boots, helmets and some of the faces. No biggy. 
  2. Couldn't think of anything else!
If you want some 15mm zombies, buy these! 

I'm working on some rules for these in FOW so I'll probably post those up once I've finished mulling it over. 
Related Posts Plugin for WordPress, Blogger...